I had the idea of designing a Dining room and including an arboretum style window feature. Then I came across somebody who had a room that didn't even have a window in it at all and I was inspired. 😃
But when looking for "Fake Window" ideas and watching several YouTube videos (by Men 😣 with power tools) on the topic, I discovered people had OVER complicated it and spent waaay too much money on it.
Plus, when I heard the phrase, "So just go over to your table saw ..." I thought, "How many people out there watching this have a Table Saw?"
or have the electrical knowledge to install a "Smart Controller".
Get real❗️🤨
And, when it was finished, it didn't actually look very nice. Pretty boring and plain. 😴
So now I have I leaped into action to tell all you regular, non-builder types (men AND women) how to do this cheaply, (excuse me), FRUGALLY and simply and make it look way nicer.
YOU WILL NEED
🔴 Glue Gun (or some type of PVA glue)
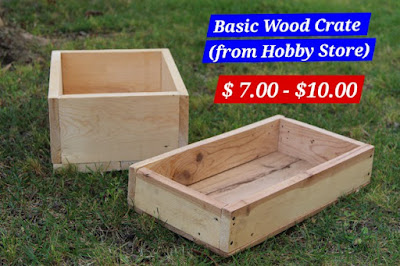
🔴 Small, Shallow Crate or Shelf unit
🔴 Pretty Nature Picture on PAPER Wall Paper
(Can often be gotten for Free if you ask for an old sample where Wallpaper is sold OR get nice similar pictures from an old magazine and make a collage of nice outdoor images YOU Like) ☺️
🔴 LED Lighting
(I chose LED because it doesn’t get hot if on for a long time)
🔴 Strong Adhesive Wall Hooks
(a Myriad to choose from. Get the ones most suitable for you.)
🔴 Nails and a Hammer
(make sure the nails aren't too short because they need to anchor the wooden box to the walk and hold some weight)
You're probably already seeing where I'm going with this but let's break it down. (I mean Build it Up) 😉
BUILDING Your WINDOW
1. You need to choose WHERE to hang it up very carefully. 🤔🤫🧐 You need to find the studs in the wall. You do this by KNOCKING all over the wall. It will make a hollow sound until you knock on a wooden stud.
(Take your time because this step you need to get right)
2. Cut your nice outdoor image the same size as the crate.
3. Glue the paper to the bottom of the Crate. (leave to dry/cool a bit)
4. Stick your LED lights to what will be the TOP of the window to shine down.
5. Nail box to the wall with several nails wherever the studs are.
Again, take your time to make sure it's LEVEL. I recommend just putting in a couple of nails to start, then putting a little water in an empty flat bottle, laying it on top of the box, and seeing if the water is level.
(Our eyes can play tricks on us) 😵💫
Once you're sure it's LEVEL, then you can hammer in more nails to make it more secure.
6. Attach Sticky Hooks to your Box which you can place your curtain rod on.
(Follow directions on Hook package)
7. Find a Rod or stick (Dollar Stores and Hobby stores are good places to get those cheaply), lay it on your Hooks and
BOOM ❗️💥
Decorate your window however you want.
🪷🌿🪷🌿🪷🌿
Keep in mind this is just a starting point for your creativity, and designed to get your creative juices flowing. You can adapt it according to your building knowledge, crafting abilities and available budget.
You might be able to cut out a recess in the wall and add a window frame and special lighting on a Dimmer Switch
OR
Maybe you can get an empty cardboard vegetable palette, paint and decorate it and stick in a touch controlled LED light, like the kind you put up in closets and under cabinets for extra illumination on work surfaces.
( This simpler version is great for people who RENT because you're not investing lots of money, you can take it with you and, because it's lightweight, you haven't had to put a bunch of holes in the wall.)
🌺🌿🌺🌿🌺🌿
Finally, I'm hoping this will inspire you creative Video Makers to make your own version of this and post it to inspire more people to get creative.
And (if you feel so inclined) put my hashtag #LauraLeeWasHere and the Link back to this blog in your video description.
Thanks for stopping by. 🙋🏻♀️
Love Always, Laura-Lee

.jpeg)


No comments:
Post a Comment